How to migrate from WordPress to EmDash
What CS Code learned moving from WordPress on a VPS to EmDash: importing content, fixing media and authentication problems, and checking the site before DNS cutover.
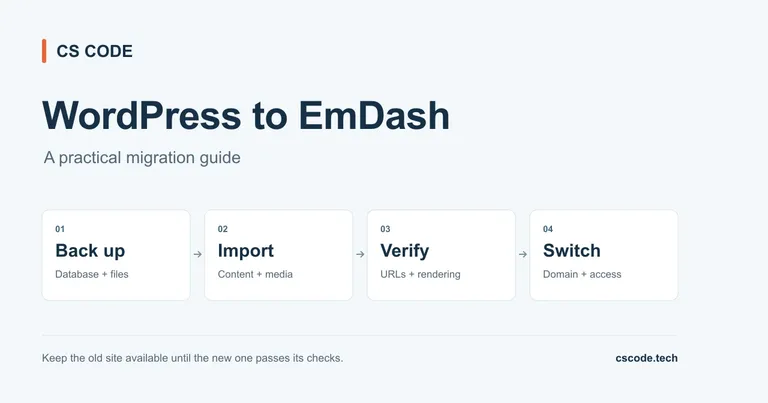
To migrate from WordPress to EmDash, prepare a staging site, import your content using a WordPress XML export or the EmDash Exporter, copy the media, and test the result before switching your domain.
That last part took more attention than the import at CS Code. We hit a media-import CPU limit, found an application-password restriction, and discovered an old code-runner page that had become little more than a heading.
This guide follows the decisions and checks that mattered during our move from a WordPress site on a VPS to EmDash on Cloudflare. The instructions were checked against EmDash's documentation in November 2026; check your installed version if a screen differs.
Decide what you actually want to move
CS Code mainly needed a place for programming articles and tutorials. We did not need quiz scoring or reader accounts, so we could leave those features out of the new site.
Make the same decision before choosing a template. List the things a reader can do on your WordPress site: read an article, search, download a file, submit a form, run code, buy something, or sign in. Next to each one, write keep, rebuild, or retire.
An imported post does not prove that its embedded application works. If your site depends on a WordPress learning platform, checkout, or membership plugin, account for that work separately.
That gave us a useful boundary: migrate the articles, and review each WordPress-dependent tool separately.
1. Back up WordPress and record your public URLs
Take a database backup and a copy of the WordPress files, including uploads, themes, plugins, and configuration. Store the backup outside the server you are changing, and check that you know how to restore it. WordPress's backup documentation explains why a database dump and a files backup are both needed.
Also download a content export through Tools → Export → All content. WordPress calls this XML format WXR. The export screen documentation lists the content it can represent, including posts, pages, terms, comments, and custom fields. Treat it as an import input, alongside your full backup.
Before touching DNS, save a list of the URLs readers already use. Include articles, pages, category archives you intend to keep, and important downloads. Add a few URLs from Search Console so your checks cover pages that already receive search traffic.
For each important page, record its title, description, canonical URL, publication date, and indexing setting. A spreadsheet is enough. It gives you something concrete to compare after the move.
Our migration checks covered 54 legacy WordPress path mappings. That number included routes needing special handling; it was not a count of published articles.
2. Set up EmDash on a temporary hostname
Keep WordPress serving the main domain while you build EmDash on a temporary hostname such as preview.example.com.
CS Code used Cloudflare Workers for the application, D1 for the database, and R2 for media. The official Cloudflare deployment guide documents that setup. Configure the database and media storage before importing, then test that you can upload an image and save an ordinary draft.
Check the current hosting allowances before importing. Page requests, database queries, storage and image transformations can have separate limits. Include the migration workload in that check.
On staging, build enough of the frontend to judge the content: an article page, a page template, navigation, search if required, and a mobile layout. Leave elaborate styling until you know the imported material renders correctly.
Keep staging out of search results. A public test site can use noindex; private test content also needs access control. Google's hosting-move guide covers testing on a temporary hostname and preventing accidental indexing.
3. Choose XML import or the EmDash Exporter
There are two supported starting points. Choose based on the data you need to carry over.
Use a WordPress XML export for a file-based import
Choose Import → WordPress in EmDash admin and upload your WXR file. The XML references attachment URLs; it does not bundle the image files. Copying media is a separate step.
Do not assume that a custom field appearing in the XML means the importer will populate a matching EmDash field. The WordPress migration documentation describes the conversion limits. Check important custom fields explicitly.
Use the EmDash Exporter when you control WordPress
The EmDash Exporter plugin runs on the WordPress side. It exposes authenticated content, media metadata, taxonomies, and supported custom and SEO fields, including Rank Math and Yoast data.
With exporter 1.2.0 or later, the current migration documentation describes generating a migration key under Tools → EmDash Migration, then using it in EmDash. The site-URL connection flow is another option and uses WordPress application-password authorization. Entering a WordPress URL without the exporter only detects the public REST API; it does not perform a direct REST import.
For a site using SEO or custom-field plugins, I would inspect the exporter route first. Still compare the destination fields with the source. Exporting SEO data does not recreate every feature of the plugin that produced it.
4. Resolve authentication before starting the import
One of the errors we encountered was:
Application Passwords are not available on this site.Wordfence was active on our WordPress installation. If you use the application-password connection flow and see this message, check Wordfence → Firewall → All Firewall Options → Brute Force Protection for Disable WordPress application passwords. Wordfence documents the setting in its brute-force protection options.
Allow application passwords for the connection if that setting is blocking them, and use HTTPS. Other security plugins or a WordPress filter can also disable the feature. Check those if changing Wordfence's setting does not resolve the error.
Keep the change narrow. You do not need to turn off the entire firewall to find out whether one authentication feature is disabled. Once migration is finished, revoke the application password you created for it and remove migration access you no longer need.
5. Import, then inspect the result before retrying
Run the import analysis first. Review collection compatibility, author mappings, taxonomy choices, and the settings and SEO options offered by your import method. Then import the content and complete the media step.
Use the analysis to catch a bad mapping before it affects dozens of entries. For example, decide whether an imported author needs a public byline, an administrator account, or both. Those are different needs.
After the run, compare the result with your inventory. Look at published entries, drafts, pages, and media separately. A total count can hide a missing page or an entry with the wrong visibility.
If a run stops partway through, inspect what it already created before starting again. Keep slugs stable while investigating. Renaming entries between attempts makes it harder to tell whether you have duplicates or missing content.
For a small blog, open every imported article. For a larger site, test examples from each content type and layout, then expand the checks around anything that fails. Check private and password-protected material before allowing public access.
6. Finish copying media while WordPress is reachable
During our media import, Cloudflare reported:
Worker exceeded CPU time limit.This happened in the media-import stage. It did not mean every article needed importing again.
Check which step failed and what remains missing. Review the Worker error, test a failing source file directly, and check whether WordPress or its firewall is rejecting downloads. If the cause is a CPU limit, compare the workload with the current Worker plan and importer version. Switching export methods does not guarantee that a destination-side resource limit disappears.
Keep the source attachments reachable until you have checked the copied files. This matters when WordPress stays on a VPS but you plan to move its domain: the files can still exist on the VPS while their old public URLs now resolve to EmDash.
Our checks covered 285 imported media URL mappings. Some were alternate URLs or non-image files, so that figure should not be read as 285 distinct images.
Check the files people use: featured images, inline diagrams, PDFs, audio, and linked downloads. A thumbnail loading on the homepage tells you very little about the rest of the library.
7. Read the imported pages as a visitor
An old page called Code 1 arrived with its heading, but the WordPress code runner had not survived. We kept the entry as a draft rather than leaving an incomplete tool on the public site.
Programming content needs a few checks that a plain-text blog might miss:
- Code blocks: long lines should scroll inside the block without widening the page. Copy an example and check that symbols and indentation survived.
- Heading links: open an existing URL containing a
#fragmentand confirm it reaches the intended section. - Images: check inline diagrams as well as the hero. Confirm that their dimensions do not overwhelm the text on desktop or mobile.
- Embedded features: try forms, videos, code runners, and anything that depended on a shortcode or WordPress plugin.
- Navigation: follow the menu, pagination, category links, and links inside older articles.
Our C interview questions article was useful for testing long code examples and heading links. Pick a similarly demanding page from your own site. A short introductory post is unlikely to reveal the same problems.
Fix a shared rendering problem in the template where possible. Otherwise, you will be repeating the same repair whenever another post uses that block.
8. Check SEO and admin access before switching DNS
Keep existing public URLs where practical. If WordPress served /article-name/, a new /posts/article-name/ route needs attention before launch. Content can be in the correct collection while still appearing at the wrong public address.
Compare the titles, descriptions, canonicals, and indexing settings you recorded earlier. EmDash has native per-entry SEO fields, but the frontend must render them. Its built-in SEO guide covers the editor fields, page metadata, and sitemap integration.
For CS Code, old root-level URLs and Rank Math descriptions needed their own checks. A completed content import was not enough to verify either.
Also plan how you will sign in after changing hostnames. Passkeys depend on the configured relying-party domain and allowed origin. Follow EmDash's domain-change instructions for your configuration, and confirm administrator access at the final address before removing staging access.
Changing a DNS record alone does not update the CMS Site URL or every canonical, email link, and social image URL derived from it.
9. Switch the domain and check the public site again
For CS Code, the WordPress installation stayed on the VPS while the main domain moved to the new application. We retained the old data as a rollback option.
Before the switch, pause publishing or make a final content pass so edits made after your export do not get left behind. Save the previous DNS values and decide what would make you roll back, such as broken important pages or failed administrator access.
Once the final domain reaches EmDash, update its Site URL through the supported domain-change flow and remove the production site's staging noindex setting. Keep any retired staging hostname redirected or protected so it does not remain a competing public copy.
Then check the normal public URLs again:
- Open important articles and confirm their content and canonical URLs.
- Test the preferred hostname and the
wwwredirect, including a nested path. - Check images and downloads without relying on a signed-in session.
- Confirm that unpublished entries stay unavailable and out of the sitemap.
- Test publishing a small correction and confirm readers receive the updated page.
- Check the sitemap, robots rules, and Search Console access.
CS Code's XML sitemap is a useful public example to inspect. Your sitemap should contain the final URLs you want indexed, and your implementation should update it when published content changes.
Retain the old hosting until you are confident the new site is serving readers and crawlers correctly. Google's hosting-move guidance recommends monitoring both sides of the move before shutting down the old infrastructure.
The check I would repeat on any migration is simple: take an old article link, open it signed out, follow its section links, copy its code, and download its files. That exercise found problems our import success message could not show.